TimescaleDB は、IoT 機器のセンサーやスマートメーターが生成するデータのように、時系列に沿って発生するデータを扱うのに適した時系列データベースの機能を、リレーショナルデータベース PostgreSQL に追加する拡張モジュールです。
この記事では、TimescaleDB の概要とインストール、基本的な使い方について紹介します。
TimescaleDB とは
TimescaleDB は米国 Timescale 社 が開発する時系列データベースで、ソースコードは GitHub リポジトリ で公開されています。ライセンスは一部が Timescale ライセンス (TSL) で、それ以外は Apache ライセンス 2.0 です。TSL 部分は簡単に言えばそれ自体をサービスとして提供しない限り自由に使えます。ライセンスについて正確には自分で確認してください。
TimescaleDB は PostgreSQL の拡張モジュールとして実装されていて、リレーショナルデータベースと NoSQL の特長をあわせもちます。
- 使いやすさ – SQL に完全対応をしていて、PostgreSQL 用のアプリケーションもそのまま接続でき、時系列データ向けの分析や管理機能も備えています。
- スケーラビリティの高さ – データは適切なサイズに分割して格納され、データ量が増えても安定して高速に書き込みでき、並列処理にも対応しています。
- 信頼性の高さ – 長い歴史をもつ PostgreSQL 上で動作し、レプリケーションやバックアップなど、PostgreSQL の機能はもちろん、PostgreSQL 用のツールも使えます。
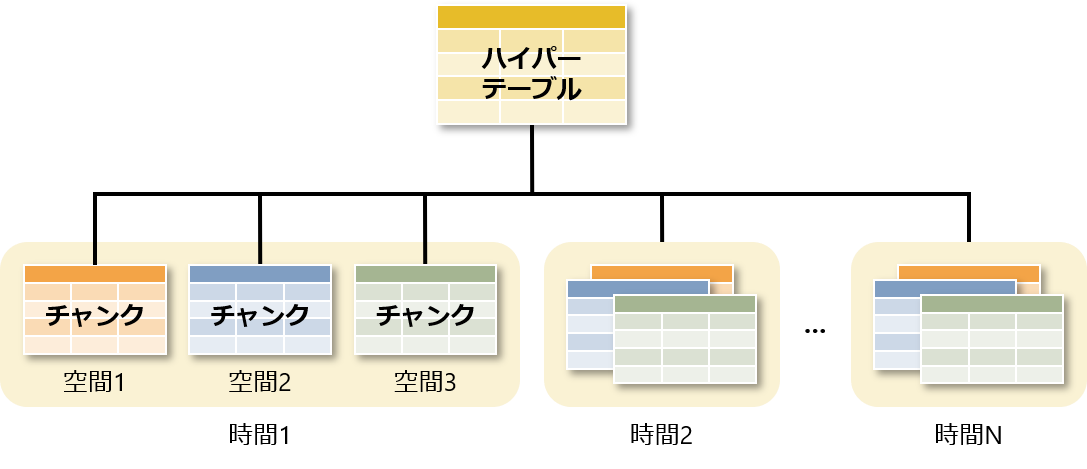
TimescaleDB では、データは内部的に時間と空間で分割されたチャンクと呼ばれるテーブルに格納され、ハイパーテーブルを介して透過的にアクセスされます。空間は時間以外にチャンクを分割する条件です。分割方式として 継承によるパーティショニング を採用していて、複数の条件で分割しても階層が多段にならない実装になっています。
TimescaleDB のインストール
TimescaleDB は各プラットフォーム向けのバイナリに加え、Docker イメージや AMI、マネージドサービス Timescale Cloud も提供されています。すべてのインストール方法については TimescaleDB Documentation の Installation を参照してください。
TimescaleDB は 2021 年 6 月時点で以下のバージョンがメンテナンスされていて、それぞれ対応する PostgreSQL のバージョンが異なります。
| TimescaleDB バージョン | 対応 PostgreSQL バージョン |
|---|---|
| 2.4以降 | 12、13 |
| 2.1~2.3 | 12、13 |
| 2.0 | 11、12 |
| 1.7 | 9.6、10、11、12 |
ここでは、CentOS 8 上の PostgreSQL 13 に Yum を使って TimescaleDB をインストールしていきます。
- TimescaleDB の Yum リポジトリを登録します。
$ sudo tee /etc/yum.repos.d/timescale_timescaledb.repo <<EOF
[timescale_timescaledb]
name=timescale_timescaledb
baseurl=https://packagecloud.io/timescale/timescaledb/el/\$releasever/\$basearch
repo_gpgcheck=1
gpgcheck=0
enabled=1
gpgkey=https://packagecloud.io/timescale/timescaledb/gpgkey
sslverify=1
sslcacert=/etc/pki/tls/certs/ca-bundle.crt
metadata_expire=300
EOF
- TimescaleDB の RPM パッケージをインストールします。
$ sudo yum -y install timescaledb-2-postgresql-13
(省略)
Installed:
  timescaledb-2-postgresql-13.x86_64 0:2.2.0-0.el8

Dependency Installed:
  timescaledb-2-loader-postgresql-13.x86_64 0:2.2.0-0.el8
  timescaledb-tools.x86_64 0:0.11.0-0.el8

Complete!
- TimescaleDB 向けに PostgreSQL の設定を行います。
設定ファイル
postgresql.confを直接編集してもよいですが、ここでは、メモリ量や CPU 数をもとに対話的に設定を行うtimescaledb-tuneコマンドを使います。$ sudo timescaledb-tune --pg-config=/usr/pgsql-13/bin/pg_config Using postgresql.conf at this path: /var/lib/pgsql/13/data/postgresql.conf Is this correct? [(y)es/(n)o]: y Writing backup to: /tmp/timescaledb_tune.backup202105010056 shared_preload_libraries needs to be updated Current: #shared_preload_libraries = '' Recommended: shared_preload_libraries = 'timescaledb' Is this okay? [(y)es/(n)o]: y success: shared_preload_libraries will be updated Tune memory/parallelism/WAL and other settings? [(y)es/(n)o]: y Recommendations based on 465.21 MB of available memory and 1 CPUs for PostgreSQL 13 Memory settings recommendations Current: shared_buffers = 128MB #effective_cache_size = 4GB #maintenance_work_mem = 64MB #work_mem = 4MB Recommended: shared_buffers = 119094kB effective_cache_size = 357282kB maintenance_work_mem = 59547kB work_mem = 2977kB Is this okay? [(y)es/(s)kip/(q)uit]: y success: memory settings will be updated WAL settings recommendations Current: #wal_buffers = -1 min_wal_size = 80MB Recommended: wal_buffers = 3572kB min_wal_size = 512MB Is this okay? [(y)es/(s)kip/(q)uit]: y success: WAL settings will be updated Miscellaneous settings recommendations Current: #default_statistics_target = 100 #random_page_cost = 4.0 #checkpoint_completion_target = 0.5 max_connections = 100 #max_locks_per_transaction = 64 #autovacuum_max_workers = 3 #autovacuum_naptime = 1min #effective_io_concurrency = 1 Recommended: default_statistics_target = 500 random_page_cost = 1.1 checkpoint_completion_target = 0.9 max_connections = 20 max_locks_per_transaction = 64 autovacuum_max_workers = 10 autovacuum_naptime = 10 effective_io_concurrency = 200 Is this okay? [(y)es/(s)kip/(q)uit]: y success: miscellaneous settings will be updated Saving changes to: /var/lib/pgsql/13/data/postgresql.conf
--pg-configオプションにはpg_configコマンドのパスを指定します。そのほかのオプションは--helpオプションで確認できます。実行を開始すると、次々に聞かれる質問に答えていきます。基本的にはyを入力していけばよいです。最後に設定がファイルに書き込まれます。 - 設定を反映するため、PostgreSQL のサービスを再起動します。
$ sudo systemctl restart postgresql-13
- TimescaleDB の拡張モジュールをデータベースにインストールします。
ここでは、PostgreSQL のスーパーユーザ
postgresに切り替わり、テスト用にtestデータベースを作成し、そこにインストールします。$ sudo su - postgres $ createdb test $ psql -c "CREATE EXTENSION timescaledb" test WARNING: WELCOME TO _____ _ _ ____________ |_ _(_) | | | _ \ ___ \ | | _ _ __ ___ ___ ___ ___ __ _| | ___| | | | |_/ / | | | | _ ` _ \ / _ \/ __|/ __/ _` | |/ _ \ | | | ___ \ | | | | | | | | | __/\__ \ (_| (_| | | __/ |/ /| |_/ / |_| |_|_| |_| |_|\___||___/\___\__,_|_|\___|___/ \____/ Running version 2.2.0 For more information on TimescaleDB, please visit the following links: 1. Getting started: https://docs.timescale.com/getting-started 2. API reference documentation: https://docs.timescale.com/api 3. How TimescaleDB is designed: https://docs.timescale.com/introduction/architecture Note: TimescaleDB collects anonymous reports to better understand and assist our users. For more information and how to disable, please see our docs https://docs.timescaledb.com/using-timescaledb/telemetry. CREATE EXTENSION
TimescaleDB の基本的な使い方
ここからは、test データベースに接続し、TimescaleDB の基本的な使い方を確認していきます。
$ psql test
psql (13.2)
"help"でヘルプを表示します。

=#
ハイパーテーブルの作成
ハイパーテーブルを作成するには通常のテーブルを作成し、create_hypertable 関数を実行します。ここでは、時間と場所ごとに温度と湿度を格納する conditions テーブルを作成し、ハイパーテーブルに変換します。
=# CREATE TABLE conditions (
     time timestamp NOT NULL,
     location text NOT NULL,
     temperature double precision,
     humidity double precision
   );
CREATE TABLE
=# SELECT create_hypertable('conditions', 'time');
    create_hypertable
-------------------------
 (1,public,conditions,t)
(1 行)
create_hypertable 関数の引数にはハイパーテーブルに変換するテーブル名、分割の条件にする時間の列名を指定します。戻り値はそれぞれハイパーテーブルの ID、スキーマ名、テーブル名、実際に作成されたかが返されます。
チャンクはデフォルトで 7 日ごとに分割されます。時間列のデータ型はタイムスタンプや日付以外に整数にも対応しています。整数の場合には値が表す時間の大きさが分からないため、チャンクを分割する間隔を chunk_time_interval 引数で指定する必要があります。例えば、時間列が秒を表し、7 日ごとに分割する場合には、7 日 × 24 時間 × 60 分 × 60 秒 = 604,800 を指定します。
(以下、例示のため、実行不要)
=# SELECT create_hypertable('conditions', 'time');
ERROR:  integer dimensions require an explicit interval
=# SELECT create_hypertable('conditions', 'time', chunk_time_interval := 604800);
    create_hypertable
-------------------------
 (1,public,conditions,t)
(1 行)
変換元のテーブルは空でないとエラーになります。migrate_data 引数に true を指定すれば、データを移行することもできます。データ量が多いと時間がかかり、外部キー制約があるとデッドロックが発生する可能性があります。通常はハイパーテーブルの作成後にデータを投入したほうがよいでしょう。
(以下、例示のため、実行不要)
=# SELECT create_hypertable('conditions', 'time');
ERROR:  table "conditions" is not empty
HINT:  You can migrate data by specifying 'migrate_data => true' when calling this function.
=# SELECT create_hypertable('conditions', 'time', migrate_data := true);
NOTICE:  migrating data to chunks
DETAIL:  Migration might take a while depending on the amount of data.
    create_hypertable
-------------------------
 (1,public,conditions,t)
(1 行)
create_hypertable 関数について詳しくは TimescaleDB Documentation の API Reference を参照してください。
時系列データの操作
時系列データの操作はハイパーテーブルを介して通常のデータと同じようにできます。ここでは、まず、データの挿入、検索、更新、削除をしてみます。
=# INSERT INTO conditions
     VALUES ('2021-05-01 09:00:00', 'tokyo', 19.4, 62.0);
INSERT 0 1
=# SELECT * FROM conditions;
        time         | location | temperature | humidity
---------------------+----------+-------------+----------
 2021-05-01 09:00:00 | tokyo    |        19.4 |       62
(1 行)

=# UPDATE conditions
   SET temperature = temperature + 0.1
   WHERE time = '2021-05-01 09:00:00'
     AND location = 'tokyo';
UPDATE 1
=# DELETE FROM conditions
   WHERE time = '2021-05-01 09:00:00'
     AND location = 'tokyo';
DELETE 1
次に、あとで分析に使うデータを生成します。データは 2020 年 1 月 1 日から 1 分間隔で 1 年間、場所は東京、名古屋、大阪の 3 か所、温度は 10 〜 30 度、湿度は 60 〜 90% の範囲でランダムです。これで 55 個のチャンクからなる 1,581,120 行、135MB のデータになります。データの投入後は ANALYZE コマンドで統計情報を更新しておきましょう。
=# INSERT INTO conditions
   SELECT time,
     location,
     round(10 + random()::numeric * (30 - 10), 1) AS temperature,
     round(60 + random()::numeric * (90 - 60), 0) AS humidity
   FROM generate_series('2020-01-01 00:00:00'::timestamp, '2020-12-31 23:59:00', '1 minute') AS time,
     unnest(ARRAY['tokyo', 'nagoya', 'osaka']) AS location;
INSERT 0 1581120
=# ANALYZE;
ANALYZE
チャンクの削除
データの削除は DELETE コマンドでもできますが、それだと不要領域が発生し、回収して再利用可能にするにはバキュームが必要です。それに対して、チャンクごと削除すれば、不要領域が発生せずに済みます。
チャンクを削除するには drop_chunks関数を実行します。ここでは、2021 年 2 月 1 より前のチャンクを削除します。
=# SELECT drop_chunks('conditions', '2020-02-01 00:00:00'::timestamp);
              drop_chunks
----------------------------------------
 _timescaledb_internal._hyper_1_2_chunk
 _timescaledb_internal._hyper_1_3_chunk
 _timescaledb_internal._hyper_1_4_chunk
 _timescaledb_internal._hyper_1_5_chunk
 _timescaledb_internal._hyper_1_6_chunk
(5 行)
drop_chunks 関数の引数にはハイパーテーブルの名前、いつより前のデータしか含まないチャンクを削除するかのタイムスタンプを指定します。戻り値は削除されたチャンクの名前が返されます。
いつより前を削除するかはタイムスタンプや日付、整数以外に間隔にも対応しています。間隔の場合には現在を基準にその間隔より前が削除されます。例えば、現在が 2021 年 5 月 1 日で、間隔が 15 か月の場合には、2020 年 2 月 1 日より前のチャンクが削除されます。
(以下、例示のため、実行不要)
=# SELECT drop_chunks('conditions', '15 months'::interval);
              drop_chunks
----------------------------------------
 _timescaledb_internal._hyper_1_2_chunk
 _timescaledb_internal._hyper_1_3_chunk
 _timescaledb_internal._hyper_1_4_chunk
 _timescaledb_internal._hyper_1_5_chunk
 _timescaledb_internal._hyper_1_6_chunk
(5 行)
drop_chunks 関数について詳しくは TimescaleDB Documentation の API Reference を参照してください。
おわりに
今回は、リレーショナルデータベースと NoSQL の特長をあわせもった時系列データベース TimescaleDB の概要、CentOS 8 上の PostgreSQL 13 への Yum を使ったインストール、ハイパーテーブルの作成や時系列データの操作など、基本的な使い方について紹介しました。
次回は、TimescaleDB の備える時系列データ向けの分析機能について紹介します。